यह आर्टिकल अभी हिंदी में नहीं है, इसलिए इसे अंग्रेज़ी में दिखाया जा रहा है।
रेफ़रेंस
Setting up Firebase for your store: project, app and keys
How to create a Firebase project, register your Android and iPhone apps, and upload the keys in Ordrio so your customers get push notifications.
The Google Firebase add-on connects your own customer app to your own Firebase project, so your Android and iPhone customers get push notifications from your store. You create the project in Google Firebase, download a few files from it, and upload them in your Ordrio admin panel.
Before you start
- You need your own customer app on Ordrio, for Android, iPhone or both.
- You need a Google account to sign in to Firebase.
- For iPhone, you also need an Apple Developer account, because the APN key comes from Apple.
- The files in this article are private keys for your app. Never share them in a chat, an email or a screenshot.
Where to find the Firebase add-on in Ordrio
- Open manage.ordrio.com (your Ordrio admin panel) and log in.
- In the menu on the left, under Grow, click Add-ons.
- Type "Firebase" in the Search add-ons box at the top. The Google Firebase card says "Connect your own app to Firebase so it can get push notifications."
- If the card shows Switch on, click it first. Then click Settings on the Google Firebase card.
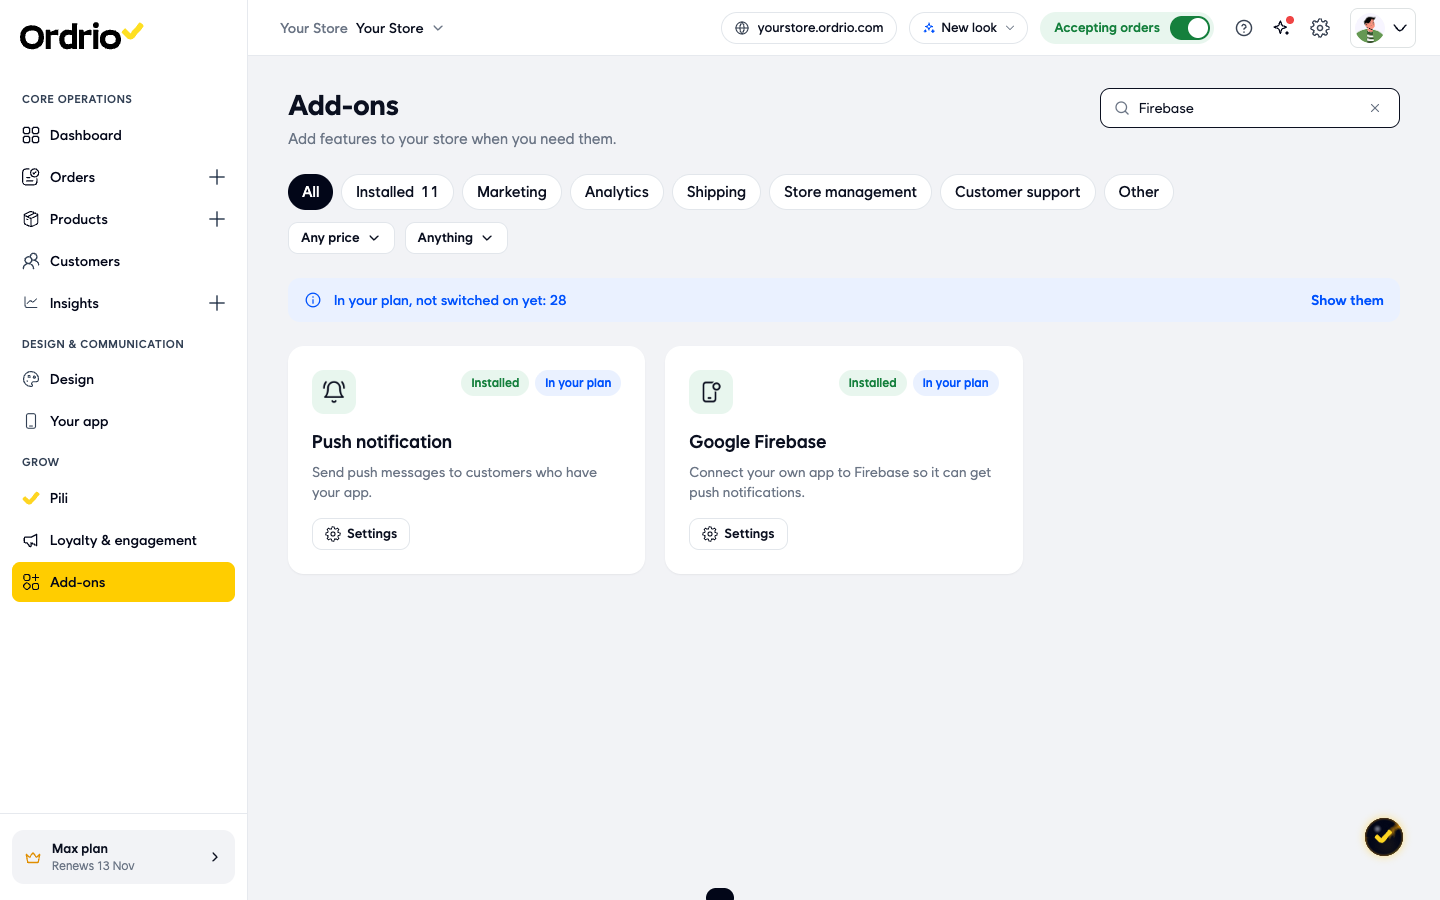
The Firebase screen opens. Keep it open in one browser tab while you work in Firebase in another.
What the Firebase screen asks for
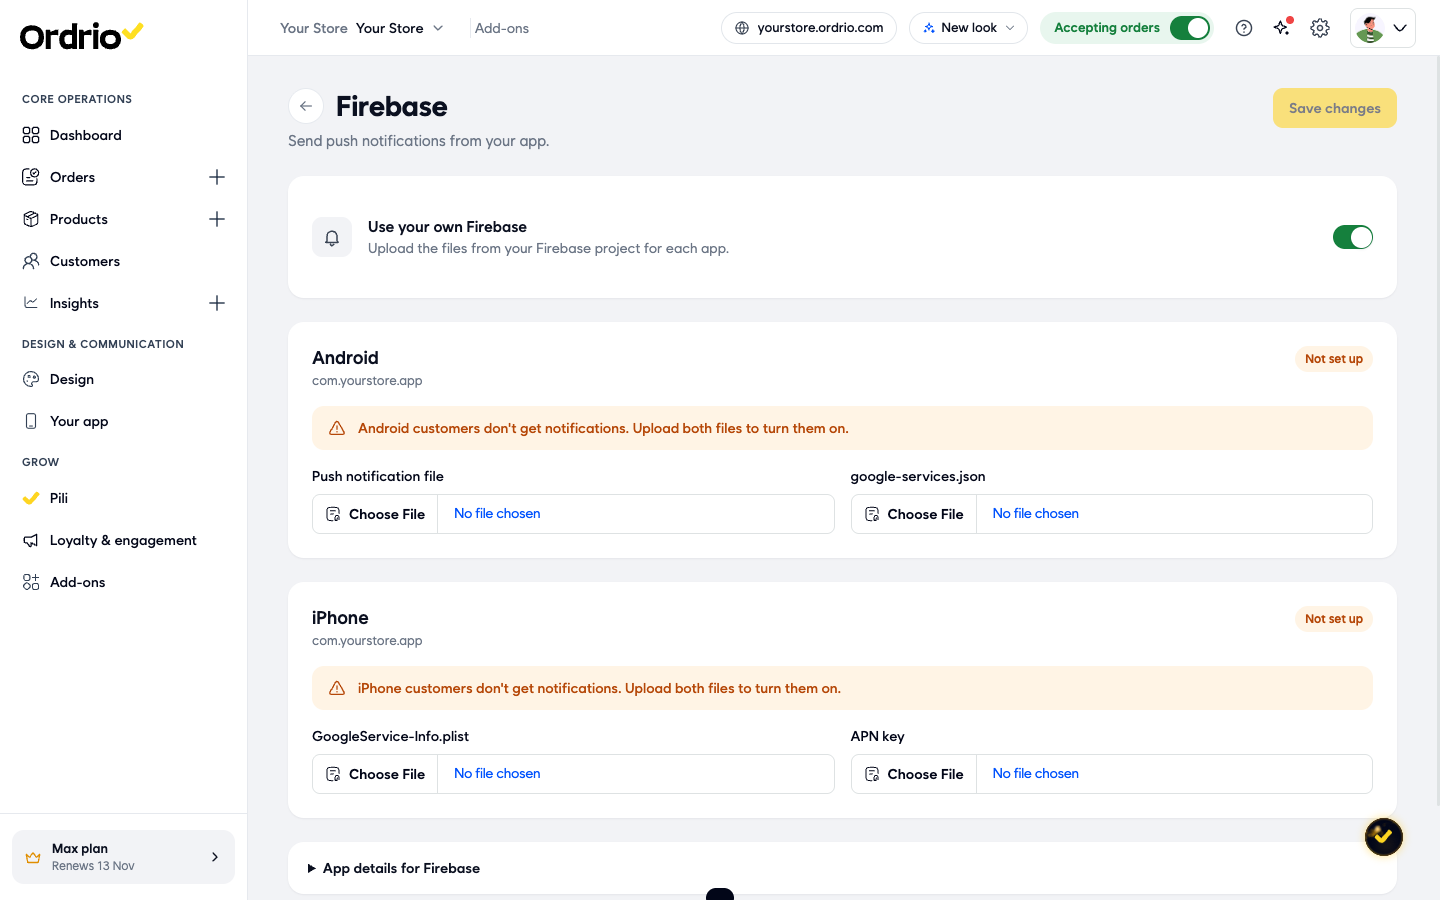
- Use your own Firebase: a switch at the top. Keep it on to send notifications through your own Firebase project.
- Android: your Android package name (for example com.yourstore.app) and a status badge. Until both files are uploaded, the badge says Not set up and the screen tells you Android customers don't get notifications.
- Push notification file: accepts a .json or .txt file. The screen does not say which file this is. Contact Ordrio support before you upload it.
- google-services.json: the Android config file from your Firebase project.
- iPhone: your iOS bundle ID and a status badge, which also says Not set up until both files are uploaded.
- GoogleService-Info.plist: the iPhone config file from your Firebase project.
- APN key: your Apple push notification key, a .p8 or .key file.
- App details for Firebase: click it to open the details you need when you register your apps in Firebase.
- Save changes: the button at the top right that saves your uploads.
Step 1: Copy your app details from Ordrio
- On the Firebase screen, click App details for Firebase at the bottom.
- Note the details under Your app details:
- Android package name: the name of your Android app. Use the copy button next to it.
- SHA-1 certificate fingerprint (upload key): shows "Available after your first Android build" until your Android app is built.
- SHA-1 certificate fingerprint (Play App Signing): you find this in Google Play Console under Setup, then App integrity, once your app is on Google Play.
- iOS bundle ID: the ID of your iPhone app. Use the copy button next to it.
- Apple Team ID: shows "Not set up yet" until it is set for your iPhone app.
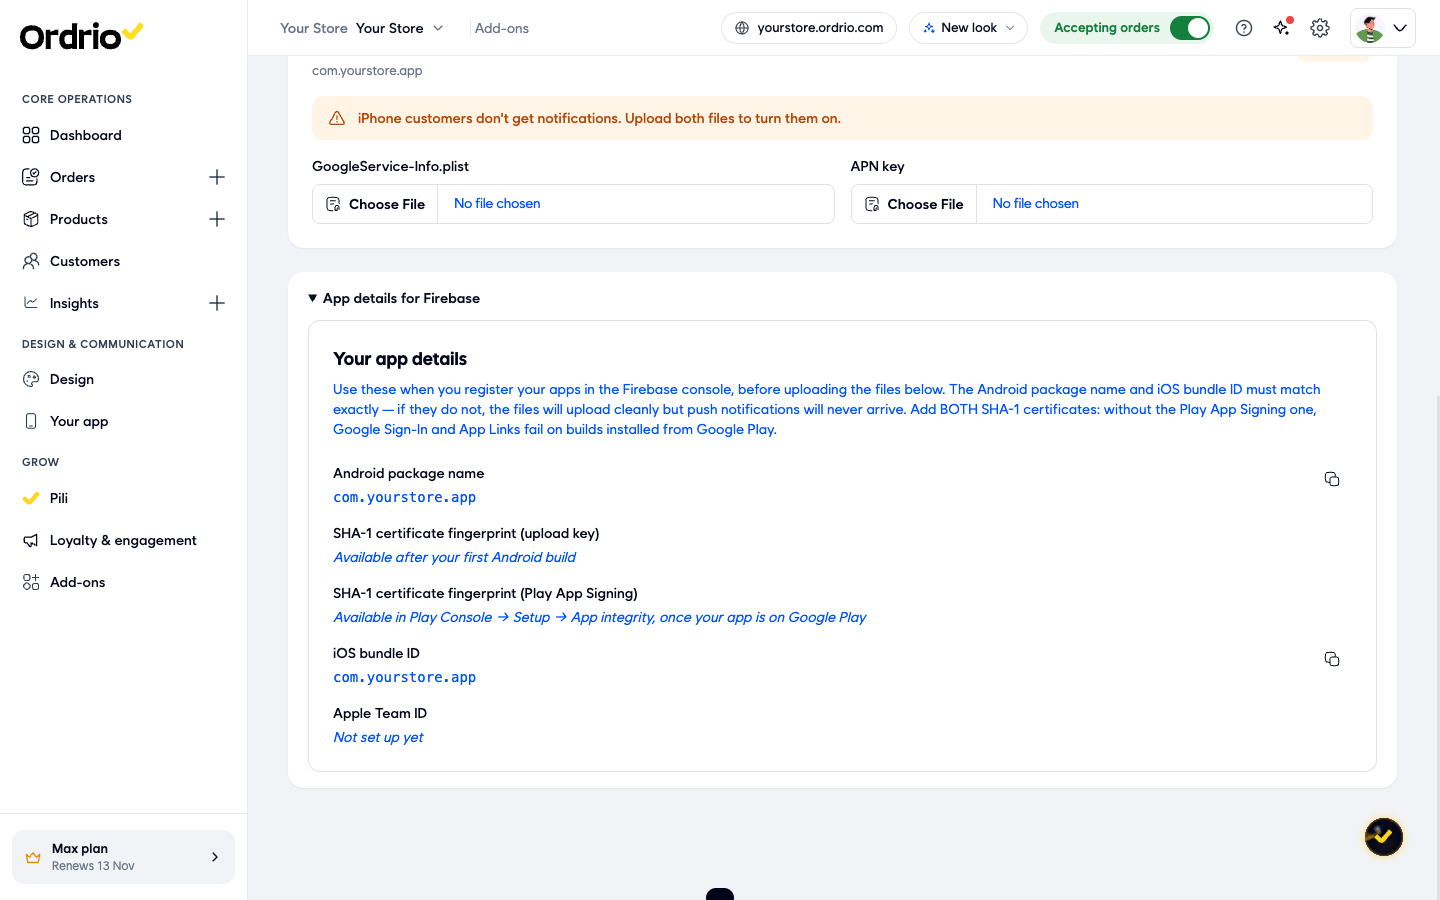
The Android package name and the iOS bundle ID must match exactly in Firebase. If they don't, the files still upload, but push notifications never arrive. Add both SHA-1 fingerprints in Firebase. Without the Play App Signing one, Google Sign-In and App Links don't work on copies of your app installed from Google Play.
These Firebase and Apple steps follow their documentation as of November 2026 and screens may differ.
Step 2: Create your Firebase account and project
- Go to the Firebase console at console.firebase.google.com.
- Sign in with your Google account. Use a business account that your team can keep using, not a personal one you might lose.
- Create a new project. Give it your store's name, for example "Your Store".
- Finish the project setup that Firebase shows. When it is done, you land on your project's overview page.
Step 3: Add your Android app and get google-services.json
- In your Firebase project, add an Android app.
- Paste your Android package name from Ordrio exactly as it is.
- Add the SHA-1 fingerprints from App details for Firebase, when Ordrio shows them.
- Download the google-services.json file Firebase gives you and keep it safe.
Step 4: Add your iPhone app and get GoogleService-Info.plist
- In the same Firebase project, add an iOS (Apple) app.
- Paste your iOS bundle ID from Ordrio exactly as it is.
- Download the GoogleService-Info.plist file Firebase gives you and keep it safe.
Step 5: Get your APN key from Apple
- Sign in to your Apple Developer account.
- Create a key for Apple Push Notifications.
- Download the key file (it ends in .p8). Apple lets you download it only once, so keep it safe.
- Note the Key ID of this key. Apple shows it next to the key.
- Note your Apple Team ID. You find it in your Apple Developer account.
- In Firebase, go to Project settings > Cloud Messaging > Apple app configuration.
- Upload the .p8 key file and type the Key ID and the Apple Team ID, so Firebase can send notifications to iPhones.
Step 6: Upload the files in Ordrio
- Go back to the Firebase screen in your Ordrio admin panel (Add-ons > Google Firebase > Settings).
- Make sure Use your own Firebase is on.
- Under Android, click Choose File next to Push notification file and pick the file Ordrio support confirms for your Firebase project.
- Under Android, click Choose File next to google-services.json and pick the file from Step 3.
- Under iPhone, click Choose File next to GoogleService-Info.plist and pick the file from Step 4.
- Under iPhone, click Choose File next to APN key and pick the key file from Step 5.
- Click Save changes at the top right.
Each app needs both of its files. Until then, its badge stays Not set up and customers on that phone don't get notifications.
Good to know
- The names and IDs in this article and on the screenshots are examples. Use your own package name, bundle ID, Key ID, Team ID and files from your own Firebase project and Apple Developer account.
- The package name and bundle ID are the most common mistake. If they differ from what Ordrio shows, the upload works but no notification arrives.
- If you only have an Android app, you only need the two Android files. The same goes for iPhone.
- If you are not sure which file to upload as the Push notification file, contact Ordrio support before you upload.
- Keep a safe copy of every file. If you lose the APN key, you have to create a new one in your Apple Developer account.
- To send notifications to your customers after this, use the Push notification add-on in Add-ons.
Related
- Push notifications on mobile
- What is Ordrio