هذا المقال غير متوفر بالعربية بعد، لذلك نعرضه بالإنجليزية.
دليل استخدام
Creating and managing coupons
Create coupon codes and control how they are used.
Coupons give your customers money off at checkout when they use a code, like FRESH50. You can choose who can use a code, which branches and products it works on, the minimum order, how many times it can be used, and when it starts and ends.
Before you start
- You need an Ordrio admin login that can open Settings.
- Decide on the discount, the code and the dates. The values in this article (FRESH50, ₹50 off, ₹300 minimum) are examples only. Use your own.
Create a coupon
- Open nadi.ordrio.com (your Ordrio admin panel) and log in.
- Click the Settings icon (the gear) at the top right of the screen.
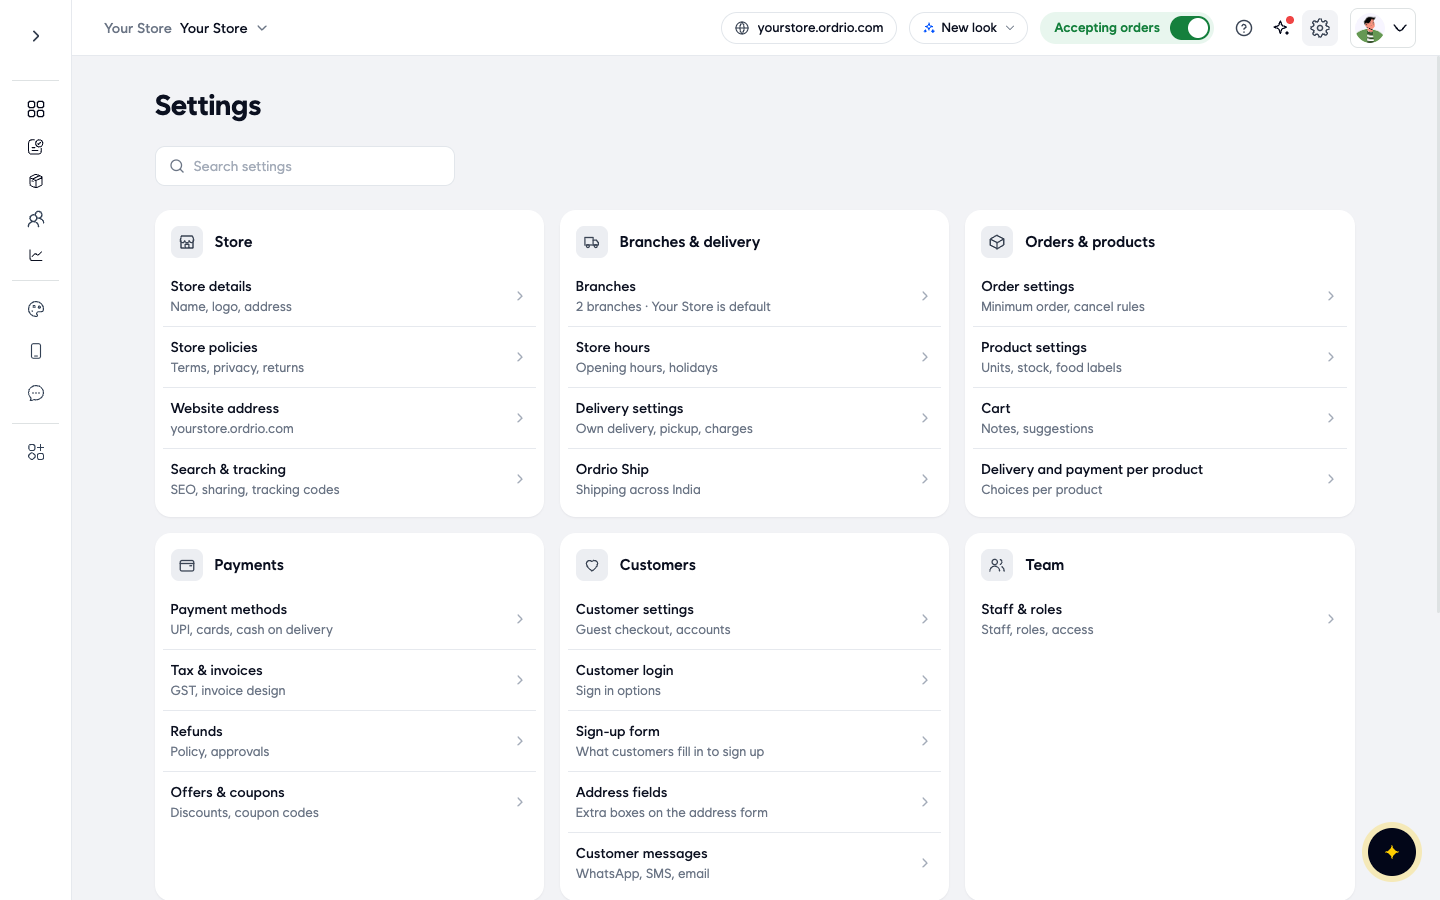
- Under Payments, click Offers & coupons. You see your coupons in three tabs: Running, Scheduled and Ended.
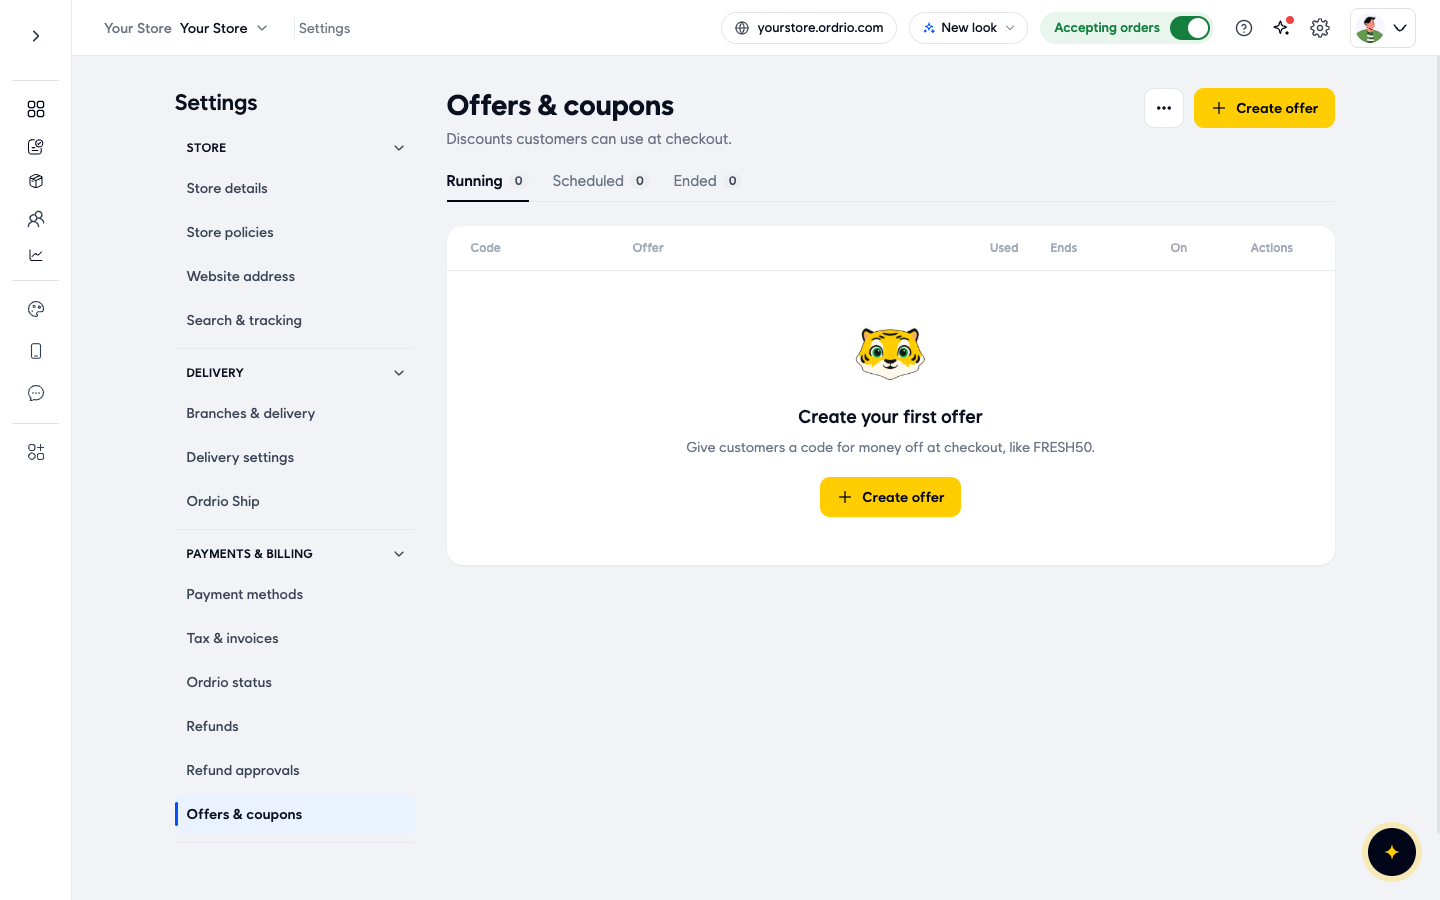
- Click Create offer. The New offer form opens. On the right, How customers see it shows a preview of your coupon, and it updates as you type.
- Under What kind of offer?, choose one:
- Amount off: a flat amount off, like ₹50.
- % off: a share of the order, like 10%.
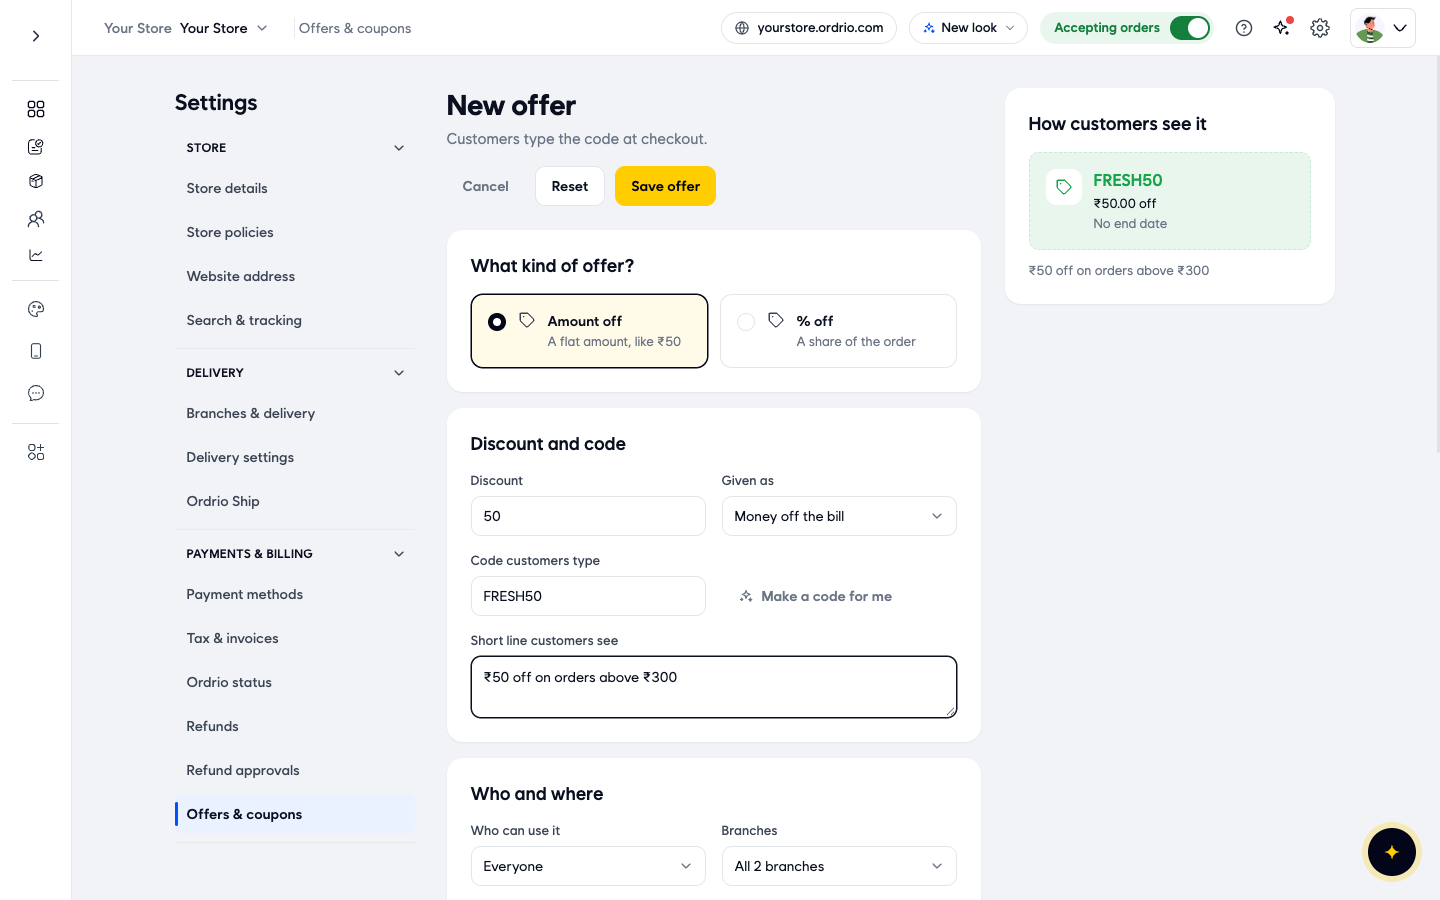
- Under Discount and code, fill in:
- Discount: the amount in rupees, or the percentage if you chose % off. This field is required.
- Given as: choose Money off the bill to take the discount off the order total, or Cashback.
- Code customers type: the code your customers enter at checkout, for example FRESH50. If you don't want to think of one, click Make a code for me and Ordrio fills in a random code.
- Short line customers see: a short sentence that explains the offer, for example "₹50 off on orders above ₹300".
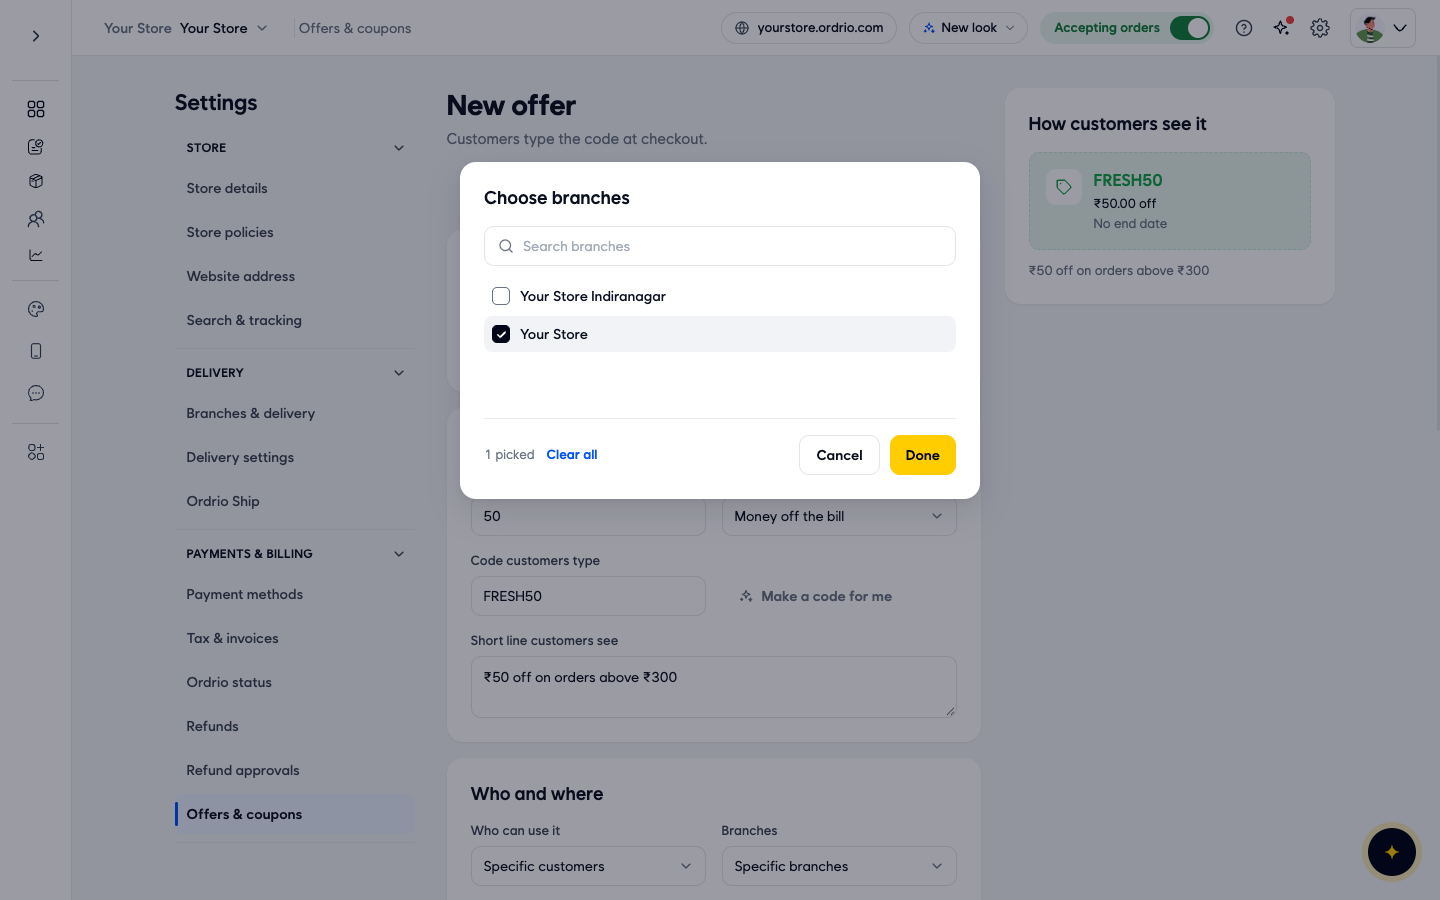
- Under Who and where, choose where the code works:
- Who can use it: Everyone, or Specific customers. If you choose Specific customers, a Choose customers window opens. Search by name, phone or email, tick the customers and click Done.
- Branches: all your branches, or Specific branches. If you choose Specific branches, tick the branches in the Choose branches window and click Done.
- Products: Everything in the store, Specific categories or Specific products. In the window that opens, type at least 3 letters to search, tick what you want and click Done.
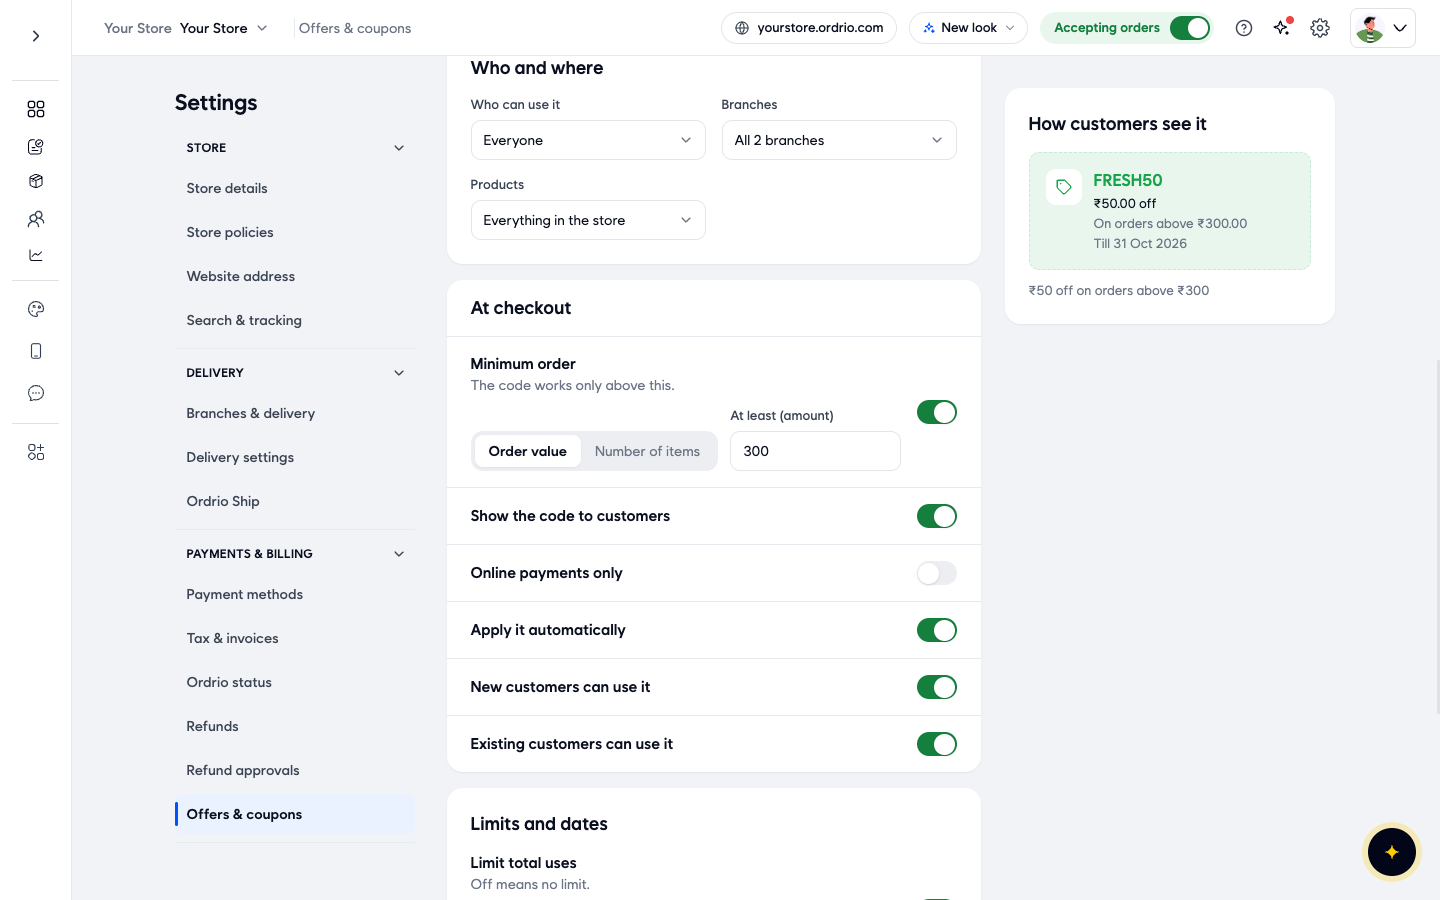
- Under At checkout, set the switches:
- Minimum order: turn it on if the code should work only above a certain order. Choose Order value and type the amount in At least (amount), or choose Number of items and type the number in At least (items).
- Show the code to customers: on by default. Turn it off if you want to share the code only with some customers yourself.
- Online payments only: turn it on if the code should work only when the customer pays online.
- Apply it automatically: on by default. Turn it off if customers should type the code themselves.
- New customers can use it: on by default.
- Existing customers can use it: on by default. Turn it off to make a code for first orders only.
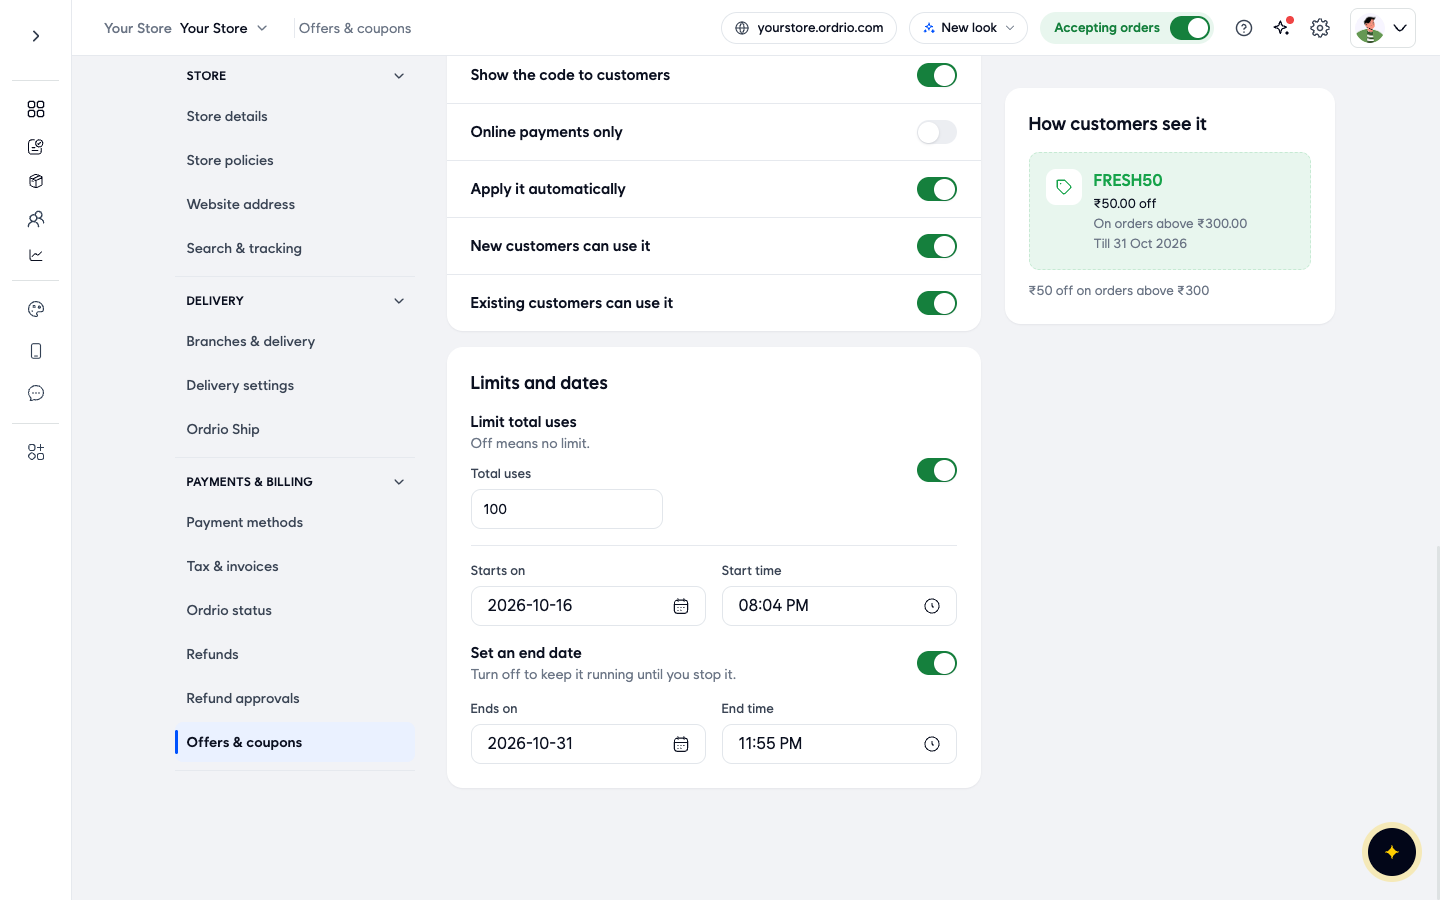
- Under Limits and dates, set how long and how often the code works:
- Limit total uses: turn it on and type a number in Total uses, for example 100. When it is off, there is no limit.
- Starts on and Start time: the day and time the code starts working. Change them if the offer should start later.
- Set an end date: turn it on and pick Ends on and End time. Choose a late end time, like 11:55 PM, so the code works all through the last day. Turn it off to keep the code running until you stop it.
- Click Save offer at the top of the form.
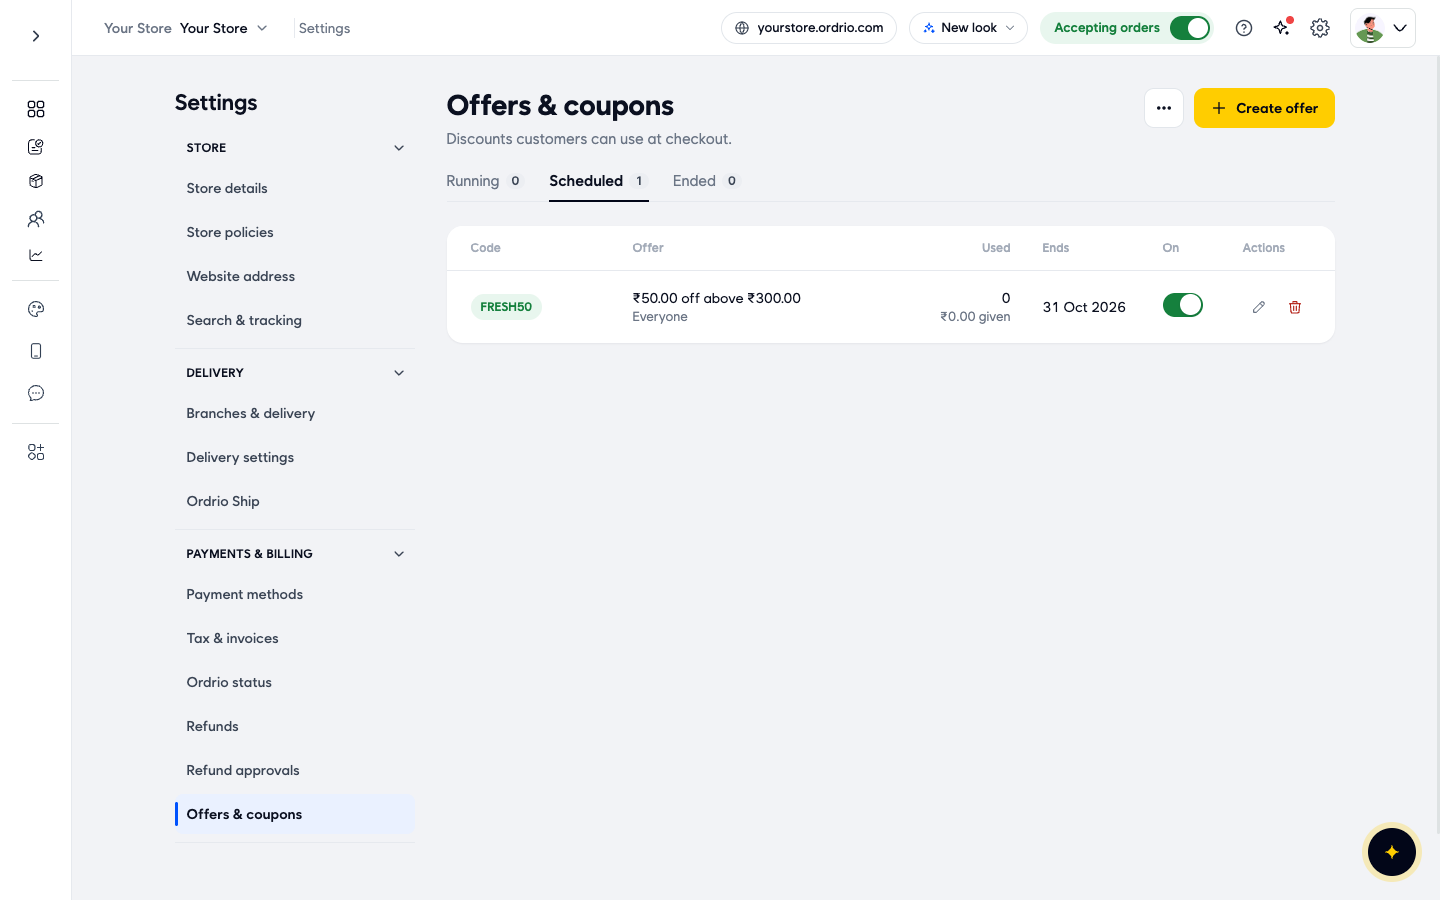
You go back to Offers & coupons. Your new coupon is under Running, or under Scheduled if its start time is still ahead. Each row shows the Code, the Offer (for example "₹50.00 off above ₹300.00" and who can use it), how many times it was Used and how much was given, the Ends date, an On switch and Actions.
Manage your coupons
- Change a coupon: click the pencil icon in Actions. The Edit offer form opens with the saved values. Make your changes and click Save offer.
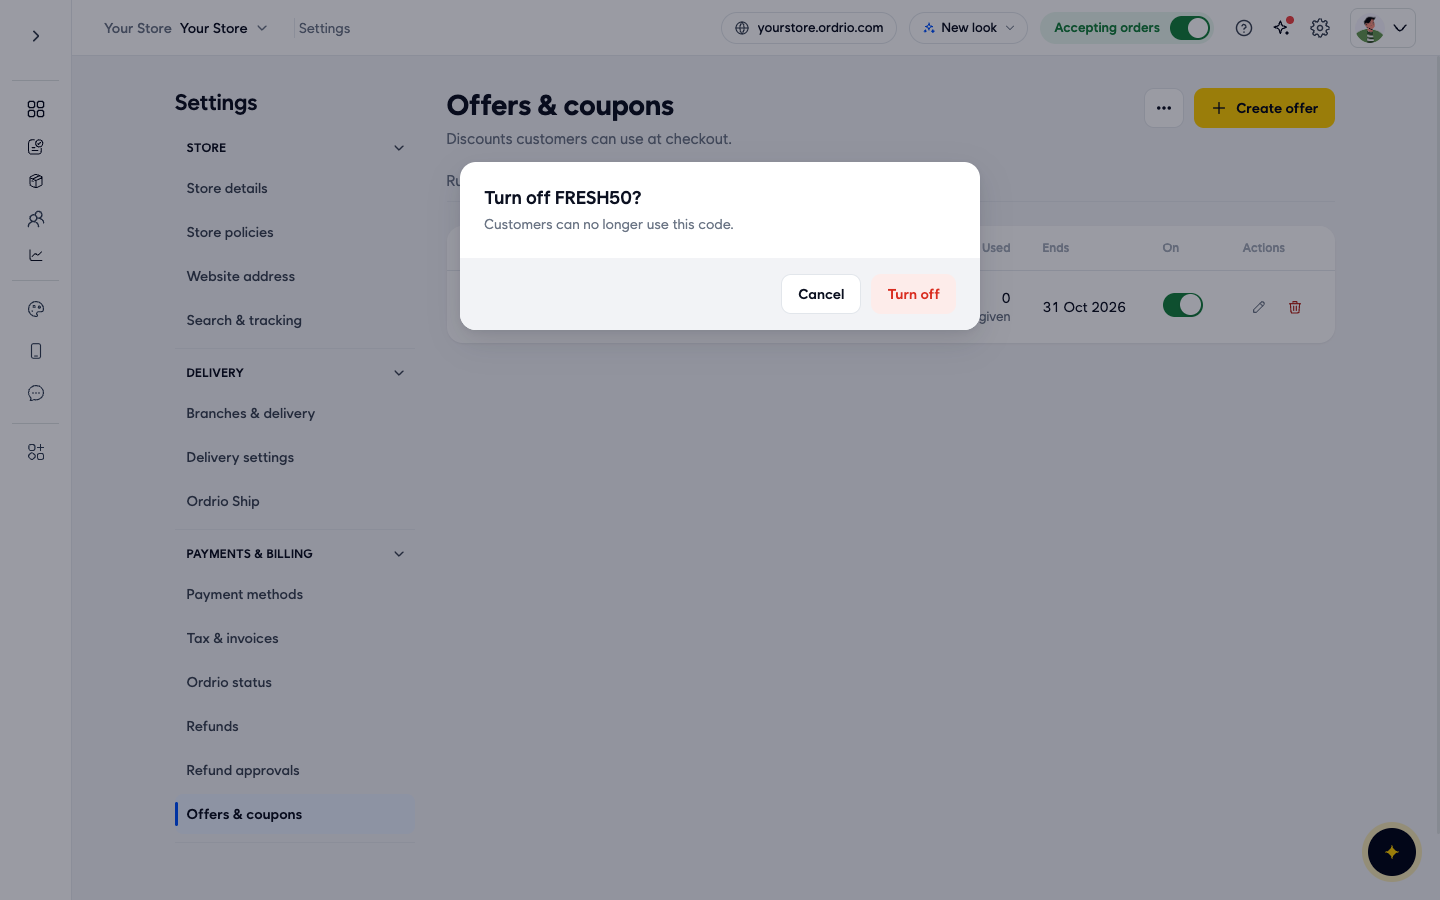
- Pause a coupon: turn off the On switch and click Turn off. Customers can no longer use the code, and it moves to the Ended tab. To bring it back, turn the switch on again and click Turn on.
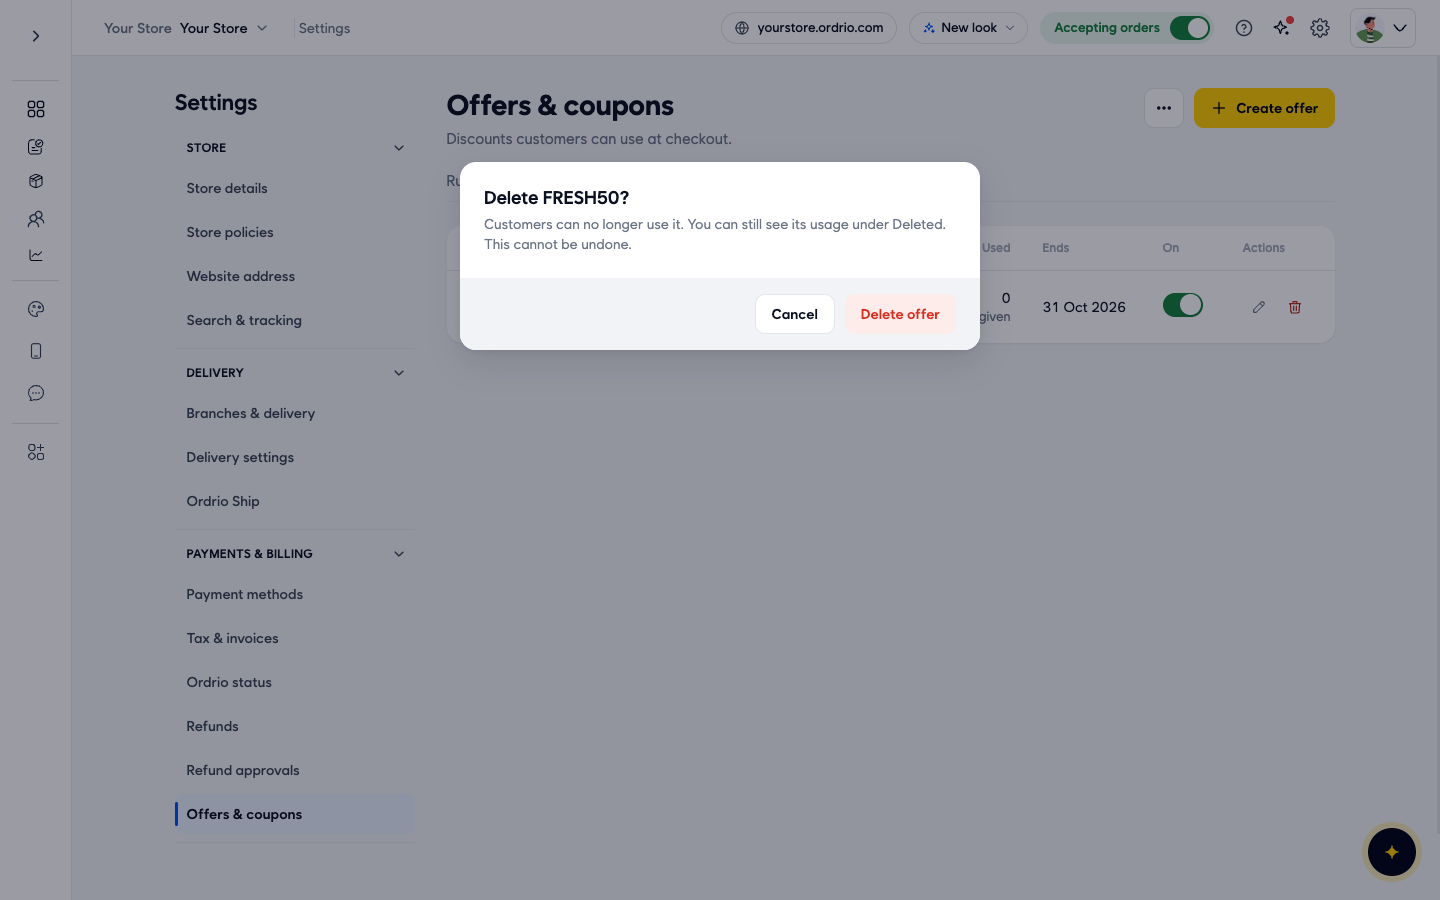
- Delete a coupon: click the bin icon in Actions and click Delete offer. Customers can no longer use it. This cannot be undone, but you can still see how much it was used.
- See how coupons are used: click the ... button next to Create offer and choose All redemptions. You can filter by From Date and End Date, search for a customer by name or phone number, and click Download CSV to save the report.
- See deleted coupons: click the ... button and choose Deleted offers. Deleted codes and how much they were used are listed there.
Good to know
- The Discount field is required. While it is empty, the form shows "Discount value is required".
- % off has no field for a maximum discount. Use Minimum order and Limit total uses to control how much a coupon costs you.
- Turning a coupon off keeps it in the Ended tab so you can turn it on again later. Deleting it is permanent.
- Check the How customers see it preview before you save. It shows the code, the discount, the minimum order and the end date the way customers see them.
Related
- Cash on delivery
- Setting up a payment gateway
- Viewing and managing orders
هل كان هذا المقال مفيداً؟